
Disclaimer
If you have no experience working with electronics, consult a professional. Besides the health risks and hazards, there is also the risk of damaging your heating system.
Depending on your location, you may not be allowed to perform these tasks without voiding your insurance coverage.
Background, Requirements, Setup
In my home, there is an older (20-year-old) central heating unit with a single room thermostat that controls the boiler. The thermostat can easily be programmed with a schedule and target temperatures. Like most of these thermostats, it is battery-powered and controls a small relay that sends a signal to the boiler.
Newer thermostat-boiler combinations use eBus to transfer control signals and other information. So, don’t attempt this setup if you have a more modern boiler/thermostat/heating unit! READ THE MANUAL OF YOUR BOILER/HEATING UNIT!
There are special adapters to connect to an eBus.
Making the Boiler Smart
Before opening my boiler, I took a closer look at my thermostat:
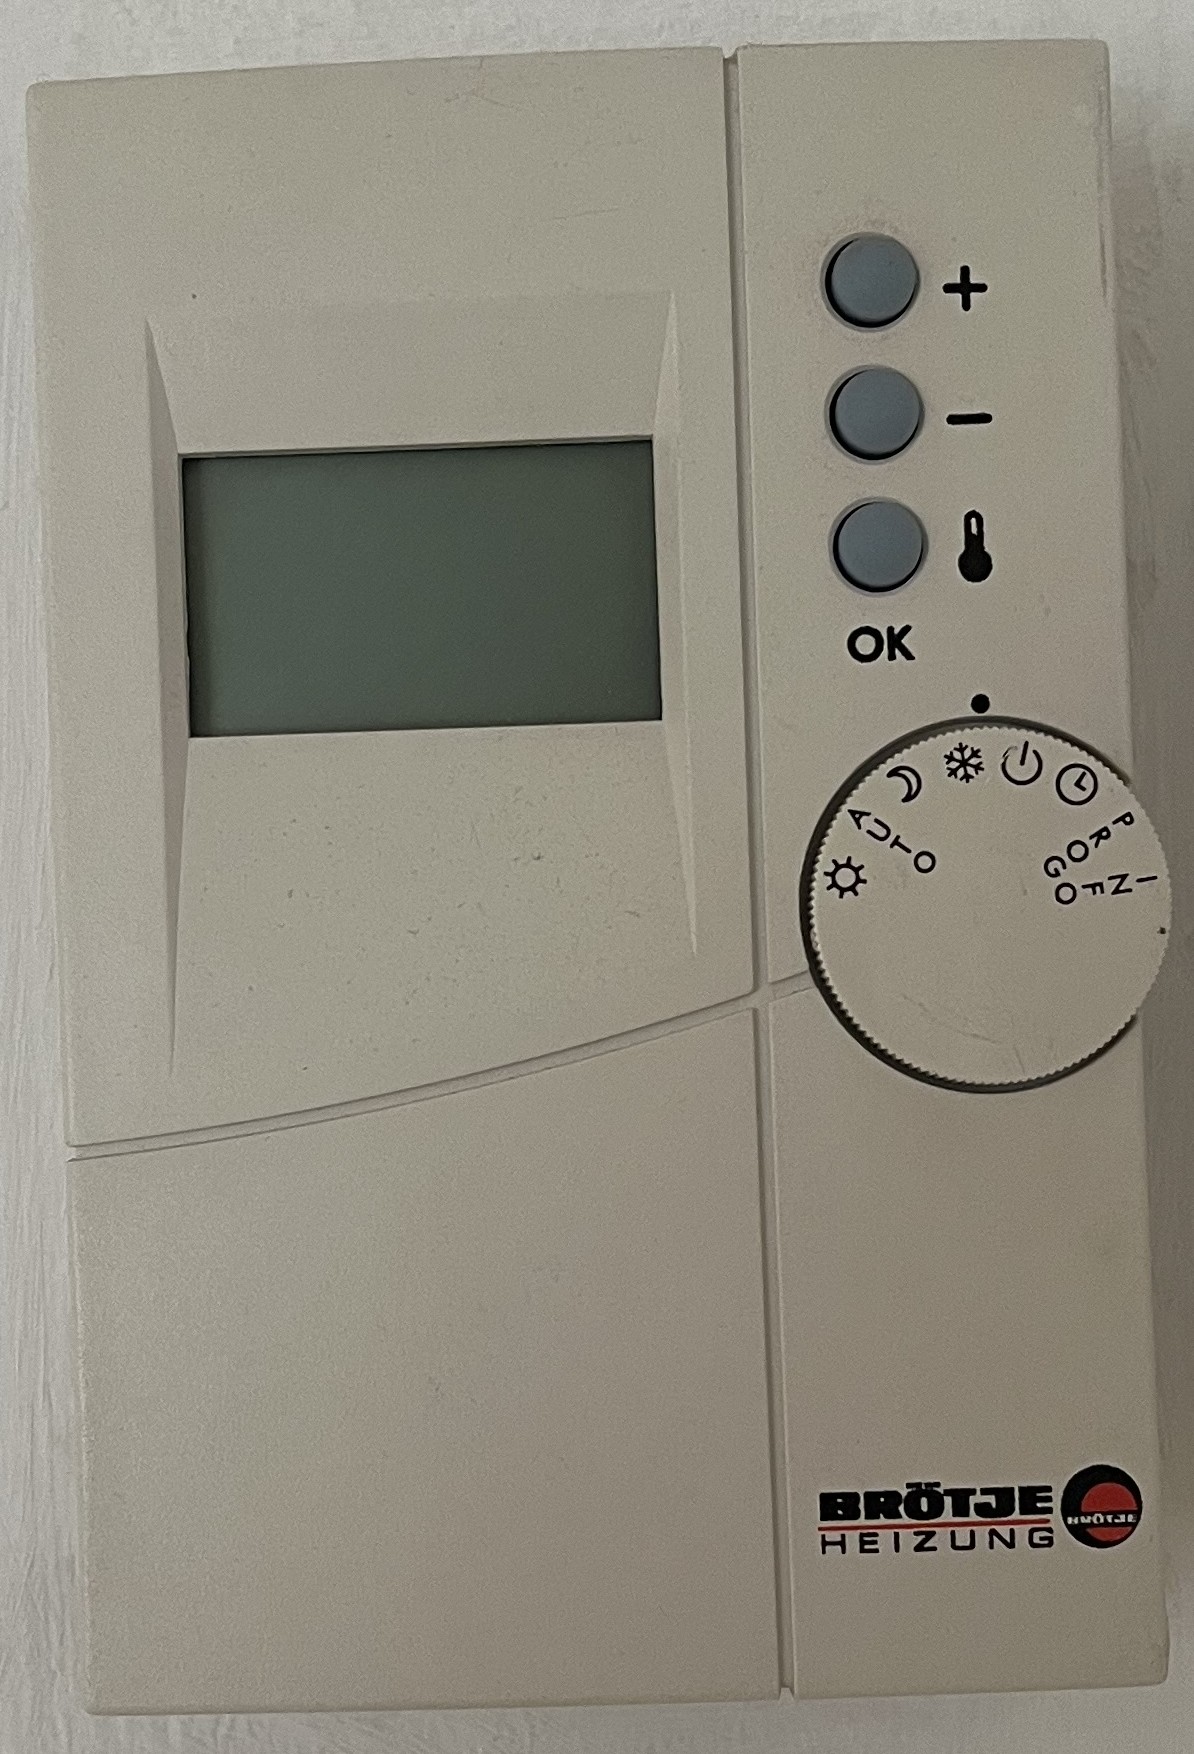

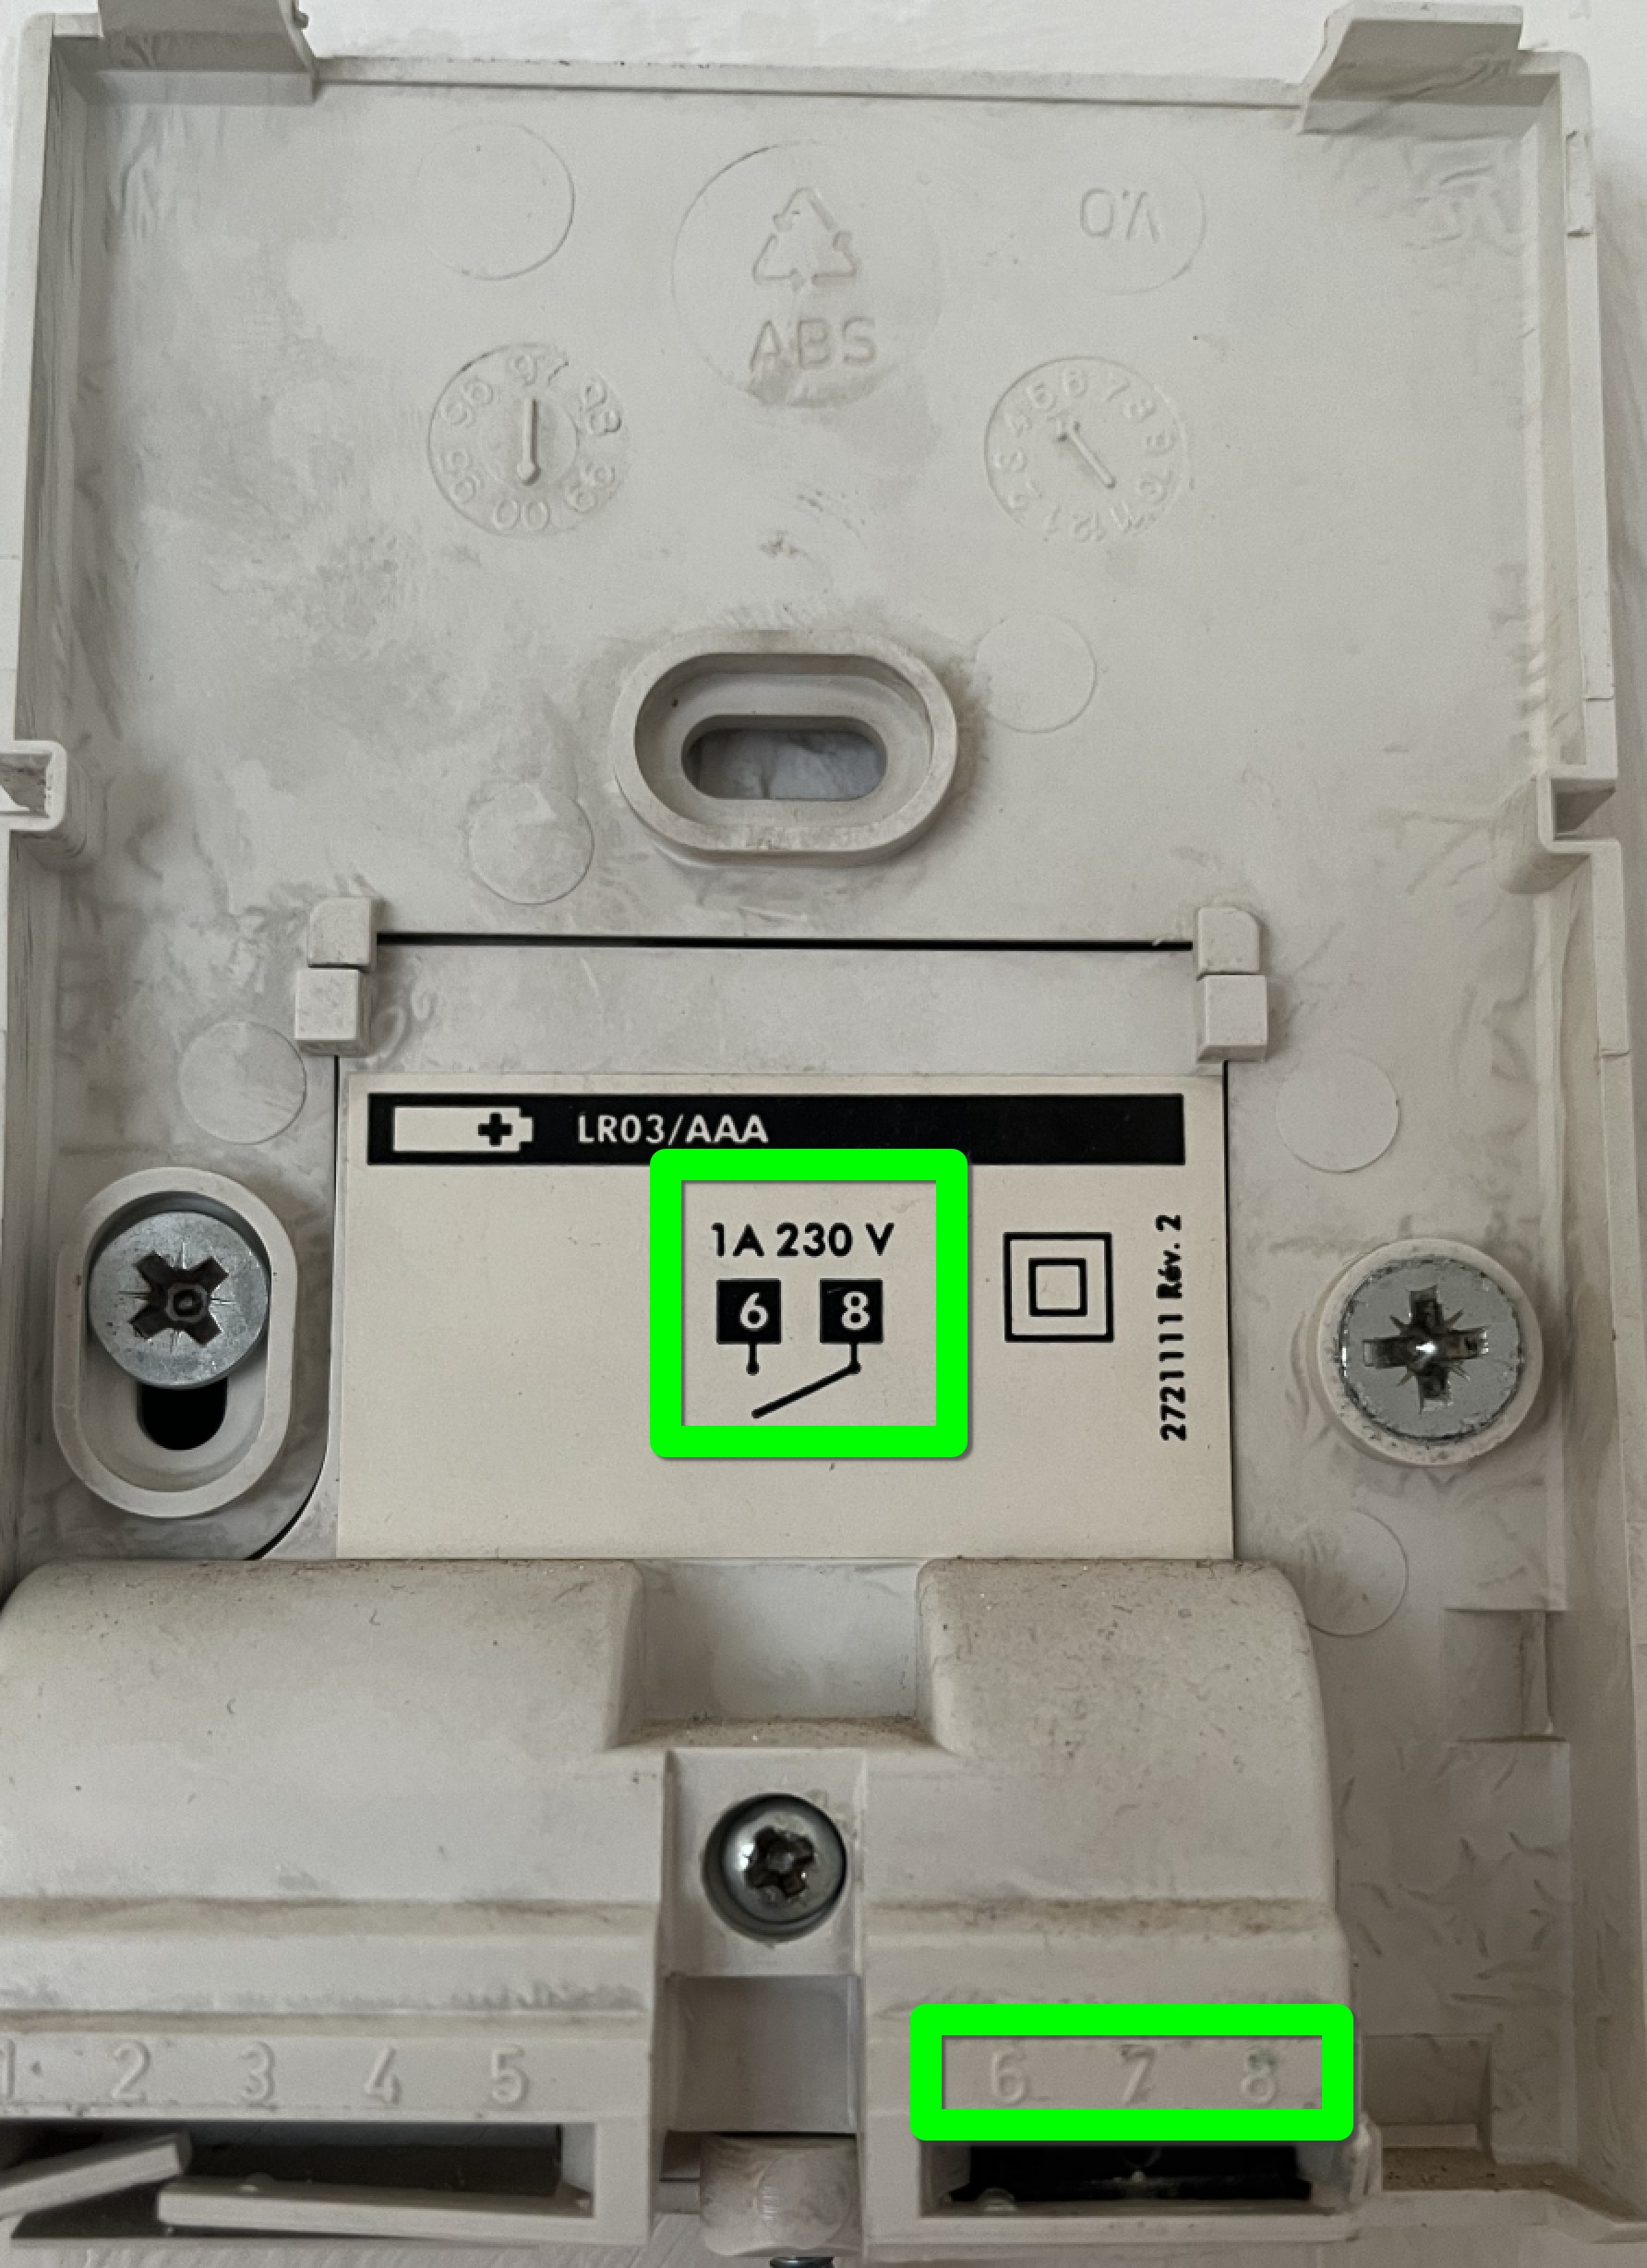
The wiring diagram shows a simple switch, indicating that it’s a relay. Easy. Shelly to the rescue!
Next step: Where do these cables end up? Must be the boiler! So, I cut the power to the boiler (maybe you should do this work in the spring or summer 😉). After confirming the power was off, I removed the cover of the boiler and found the cables from the thermostat/relay.
Use the appropriate tools to double-check that the power is off and ensure the power stays off.
I took out the breaker.

The manufacturer of my boiler (Brötje) was nice enough to include the wiring diagram for the control unit inside the cover. It confirmed that the thermostat is a simple relay. And it’s optional—you can run the heating without the thermostat, making it super dumb.
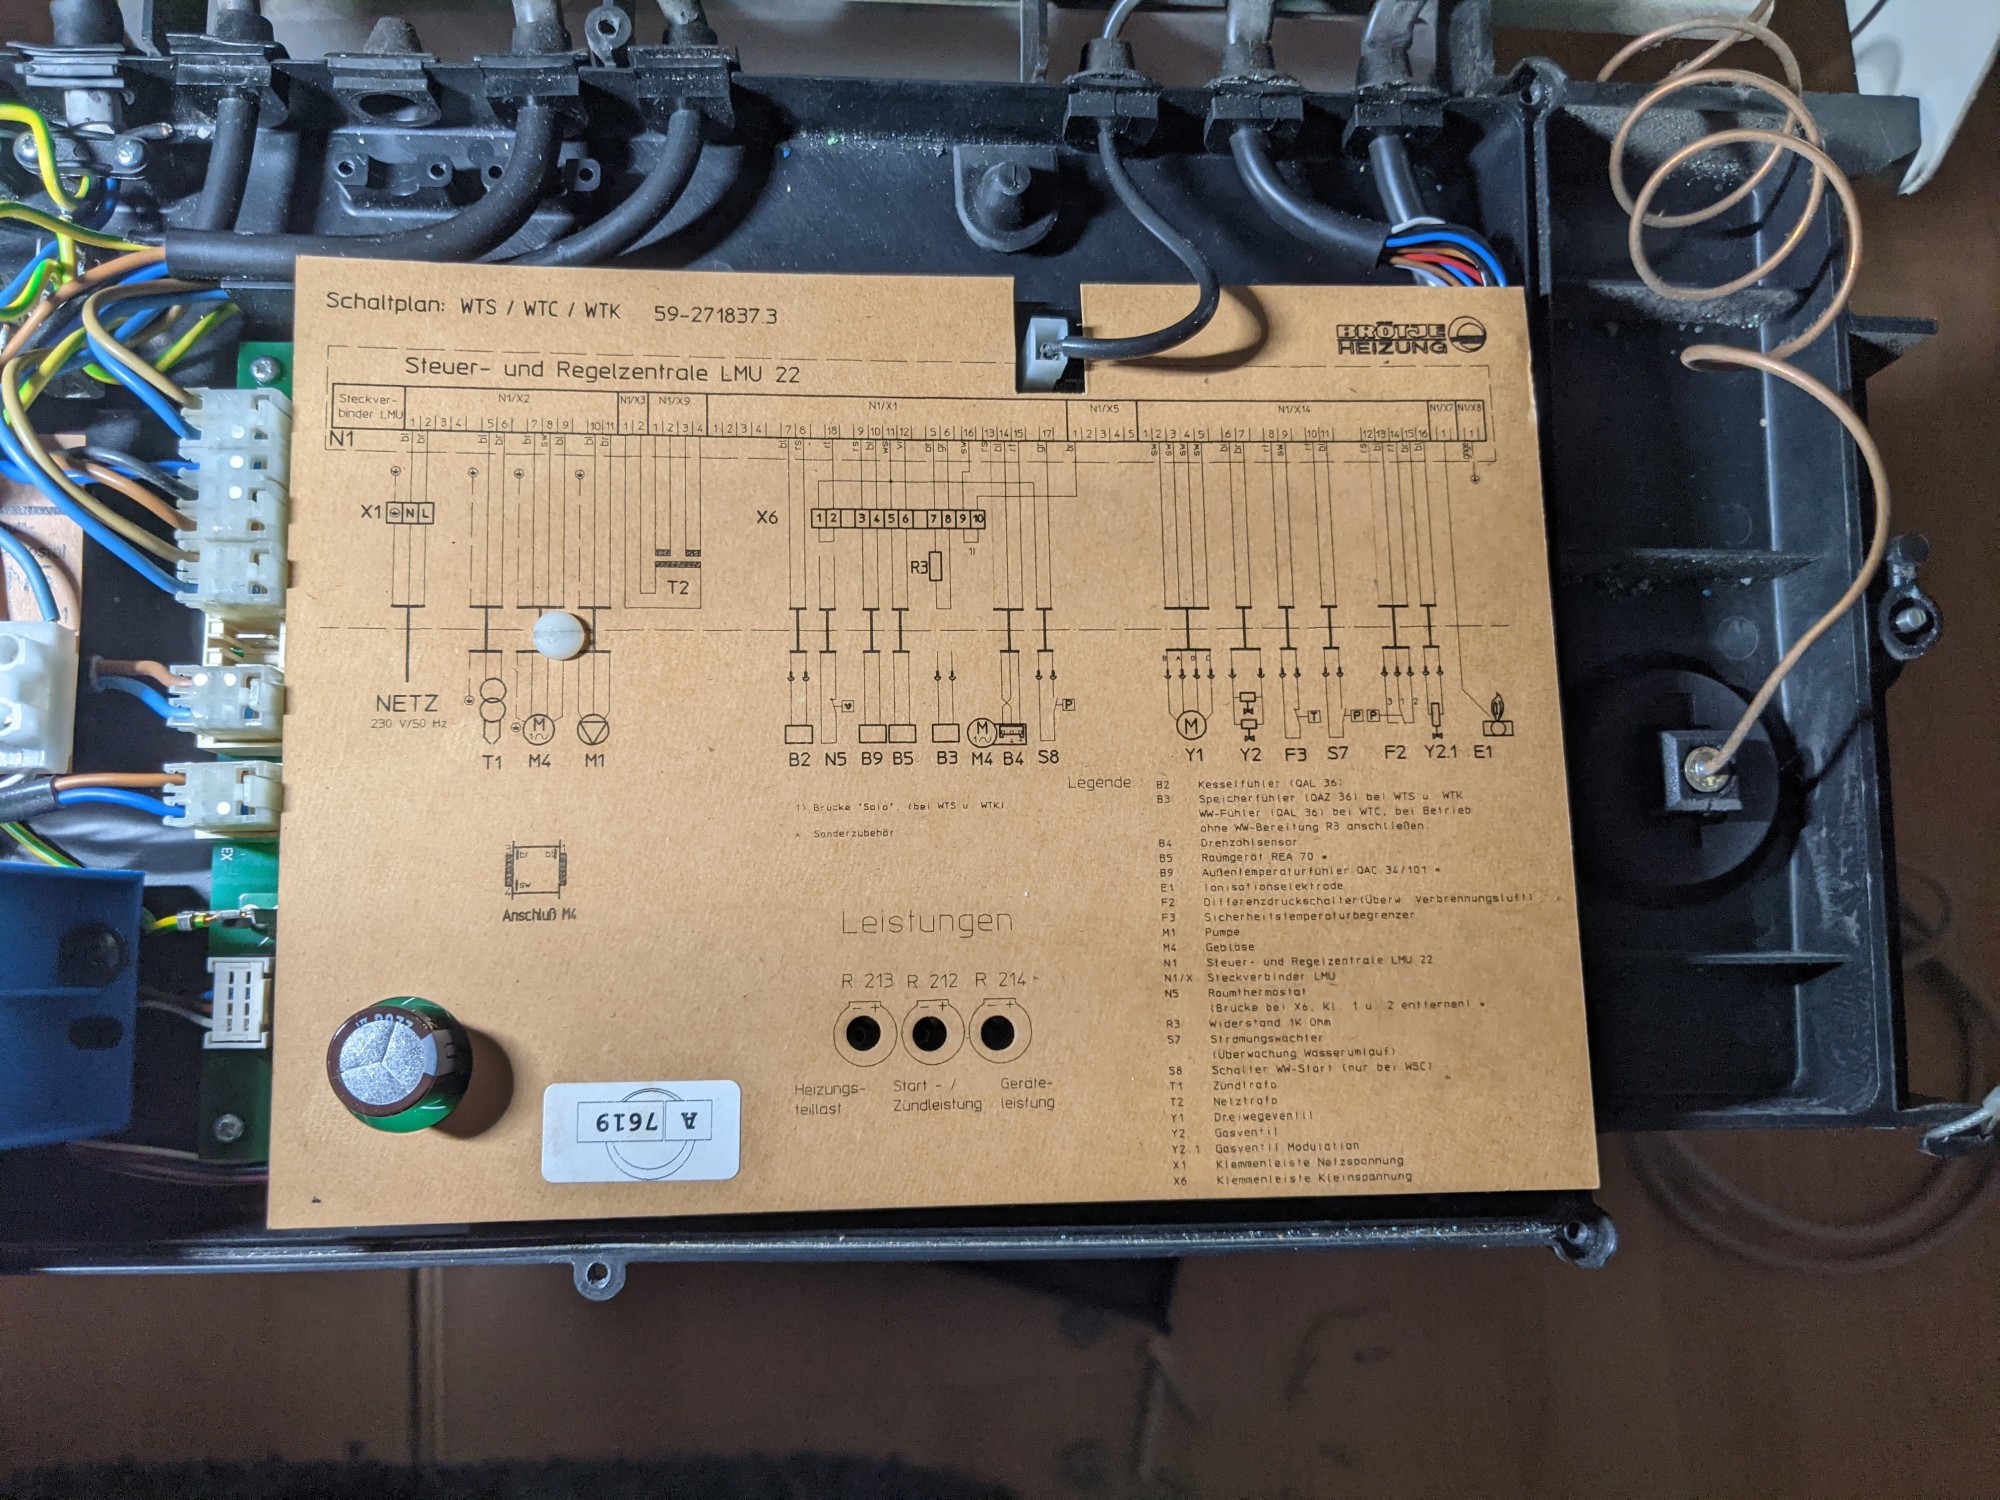
Following the schematic and the current cabling, I connected the Shelly’s IO to N5, replacing the thermostat.
You could keep the thermostat and use it as an input switch for the Shelly, which would allow for an easy fallback. This is nice in case you want to take manual control again.
It’s always good to have a non-smart fallback. You don’t want to sit in the cold just because your WiFi is down.

That’s it. Double-check all connections, power it on, and bring the Shelly into your network. It will be detected by Home Assistant automatically.
TRVs in Your Rooms
Now that we’ve removed the thermostat, we need to replace that input. We can now power on the boiler using the Shelly, but we want to trigger the Shelly via automation in Home Assistant.
The thermostat had a big shortcoming: it was placed in just one room of the flat. If my bedroom was too cold, tough luck! The thermostat was in the living room, and in the living room, it’s cozy!
Hence, we use TRVs. Choose whatever TRVs you like. I have Aqara E1 via Zigbee, Shelly TRV via WiFi, and some cheap Tuya TRVs. All work great.
The Tuya ones work fine, and they only cost €15–€20, compared to €35–€45 for the Shelly or Aqara.
After you install the TRVs… do you have windows? Probably! And you don’t want to have the heating running if windows are open in that room.
Instead of building that logic manually, you can either use Schedy with AppDaemon,versatile thermostat or BetterThermostat. I just switched from Schedy to BT. Let’s see how it goes.
Schedy is harder to set up, but you can write your own code.
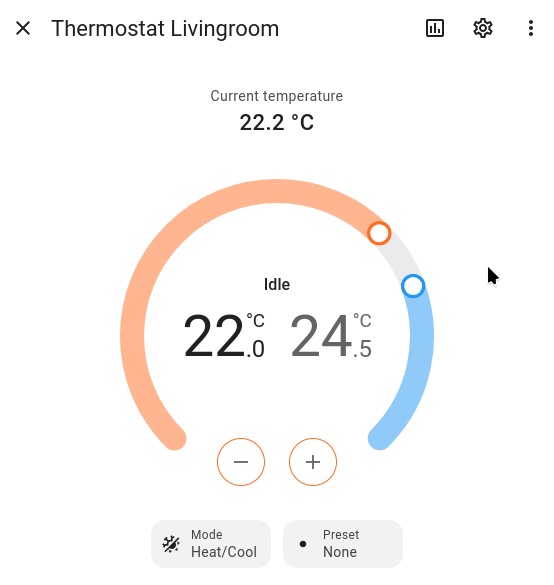
Once you have your TRVs installed, connected, and visible in Home Assistant, it’s time to make it all come together.
I opted for BetterThermostat now. Let’s see how it goes.
After a couple of days with BetterThermostat I already switched to versatile thermostat. The the overlaying devices became unavailable for unknown reasons, the documentation is scarce. None of this is the case for versatile thermostat.
** Update [April 2025] **: Even though I stuck with versatile thermostat, I am not 100% happy with it.
There are sudden changes in target temperatures which I can’t explain. But the reason I am looking for another solution is the fact, that the central boiler is not stopped, once all overlay thermostat reached their target temperatures.
Every room has a dedicated temperature sensor which is not the valve, which gives better/more accurate readings. That is the entity used for the current value in versatile thermostats. I would assume, if my target temperature equals the current temperature in the room, the central boiler gets deactived. But that is not the case, if an underlying thermostat has not reached it’s target temperature, the boiler stays on and the room continues to heat up.
Hence: find a more simple logic here to use with schedy:
I used Schedy for years before and rarely had to make any changes.
Home Assistant
In your configuration.yaml, add the following code to use templated variables:
template: !include files/variables.yamlYou can obviously put that file wherever you want. Maybe you even have templates somewhere—if so, use that file.
Detecting if We Have Rooms That Need Heating
I continue with that example though.
So open your files/variables.yaml and add
binary_sensor:
  - name: "Low Temperature in a Room"
    unique_id: low_temperature_in_room
    state: >
        {%- if states('climate.thermostat_office') not in ['off','unavailable'] -%}
        {%- set office_temp_cur = state_attr("climate.thermostat_office", "current_temperature") | float -%}
        {%- set office_temp_trgt = state_attr("climate.thermostat_office", "target_temp_low") | float -%}
        {%- set office_low = office_temp_cur < office_temp_trgt -%}
        {%- else -%}
        {%- set office_low = False-%}
        {%- endif -%}

        {%- if states('climate.thermostat_diningroom') not in  ['None', None, 'Off','off', 'unavailable'] -%}
        {%- set dining_temp_cur = state_attr("climate.thermostat_diningroom", "current_temperature") | float -%}
        {%- set dining_temp_trgt = state_attr("climate.thermostat_diningroom", "target_temp_low") | float -%}
        {%- set dining_low = dining_temp_cur < dining_temp_trgt-%}
        {%- else -%}
        {%- set dining_low = False -%}
        {%- endif -%}


        {{ True if ( office_low or dining_low ) else False}}

    icon: mdi:gas-burner
    attributes:
      rooms_with_low_temp: >
        {%- set cold_rooms = [] -%}

        {%- if states('climate.thermostat_office') not in ['off','unavailable'] -%}
        {%- set office_temp_cur = state_attr("climate.thermostat_office", "current_temperature") | float -%}
        {%- set office_temp_trgt = state_attr("climate.thermostat_office", "target_temp_low") | float -%}
        {{ cold_rooms + ["Office"] if (office_temp_cur < office_temp_trgt) }}
        {%- endif -%}

        {%- if states('climate.thermostat_diningroom') not in  ['None', None, 'Off','off', 'unavailable'] -%}
        {%- set dining_temp_cur = state_attr("climate.thermostat_diningroom", "current_temperature") | float -%}
        {%- set dining_temp_trgt = state_attr("climate.thermostat_diningroom", "target_temp_low") | float -%}
        {{ cold_rooms + ["Dining Room"] if (dining_temp_cur < dining_temp_trgt) }}
        {%- endif -%}
This creates a binary sensor that is either true or false, comparing the target temperature of your thermostat with the current temperature. If the current temperature is below the target, it sets the variable to true as in room with low temperature: true.
For easier troubleshooting, we add the rooms with low temperatures as an attribute to the same variable.
Fire Up the Boiler If a Room Is Too Cold
Now, we just need to turn on the output of the Shelly connected to the boiler if one or more rooms are too cold.
I used a simple automation like this:
alias: "Heating: Turn on Boiler if there are rooms with low temp"
description: files/variables.yaml for more details on the binary_sensor
mode: single
triggers:
  - entity_id:
      - binary_sensor.low_temperature_in_a_room
    to: "on"
    for:
      hours: 0
      minutes: 2
      seconds: 0
    trigger: state
conditions: []
actions:
  - type: turn_on
    entity_id: switch.boiler
    domain: switch
I wait for at least 2 minutes before turning on the boiler to avoid flapping.
Same logic to turn off the boiler once we’ve reached the target temperature:
alias: "Heating: Turn off Boiler when there are no more rooms with low temperature"
description: files/variables.yaml for more details on the binary_sensor
mode: single
triggers:
  - entity_id:
      - binary_sensor.low_temperature_in_a_room
    to: "off"
    for:
      hours: 0
      minutes: 5
      seconds: 0
    trigger: state
conditions: []
actions:
  - type: turn_off
    entity_id: switch.boiler
    domain: switch
Summary
We now have an automation that monitors the temperatures in every room we want and fires up the boiler when necessary.
You can adapt the automation, target temperature, or any other parameters as needed. You can lock the TRVs to avoid manual overrides, but you can still use the manual override, and the automation will continue working.
Reach out for feedback and share your setup!
Addon: Schedy
Inside /root/addon_configs/a0d7b954_appdaemon/apps the schedy.yaml looked like this for me:
schedy_heating: # This is our app instance name.
  module: hass_apps_loader
  class: SchedyApp

  debug: false
  reset_at_startup: true
  actor_type: thermostat

  # In the following config block, you may define templates with
  # settings that affect multiple actors in your setup. These can then be
  # used as a starting point for the configuration of individual actors.
  # Nested inclusion of templates is possible as well.
  actor_templates:
    # By default, an actor inherits its settings from the "default" template.
    default:
      # This setting tells Schedy how often it should try sending a
      # value to the actor. If the actor reports the set value back, no
      # further retry is made. You may find this useful if the connection
      # between Home Assistant and your actor is unreliable. Set to 0 in
      # order to disable retrying entirely.
      send_retries: 100
      # How many seconds to wait before retrying.
      send_retry_interval: 30

  expression_environment: |
    def heating_mode():
        return state("input_select.heating_mode_2")

    def vacation_temp():
        print(f'Setting Vacation Temp ({state("input_number.vacation_temperature")}°C)')
        return state("input_number.vacation_temperature")

    def day_temp(room: str, target_temp: str = "input_number.day_temperature"):
        print(f'Setting Day Temp ({state(target_temp)}°C) for {room}')
        return state("input_number.day_temperature")

    def night_temp(room: str):
        print(f'Setting Night Temp ({state("input_number.night_temperature")}°C) for {room}')
        return night_temp

    def off_temp(room: str):
        print(f'Setting Off Temp (7°C)')
        return 7  # You can replace 5 with the actual off temperature or state

  schedule_snippets:
    office:
      - {
          x: "day_temp('office')",
          start: "09:30",
          end: "17:30",
          months: "1-4,9-12",
          weekdays: "1-5",
        }
      - {
          x: "day_temp('office')",
          start: "11:00",
          end: "17:00",
          months: "1-4,9-12",
          weekdays: "6-7",
        }
      - {
          x: "off_temp('office')",
          start: "00:00",
          end: "23:59",
          months: "5-8",
          weekdays: "1-7",
        }
    dining:
      - {
          x: "day_temp('dining room')",
          start: "08:00",
          end: "22:30",
          months: "1-4,9-12",
          weekdays: "1-5",
        }
      - {
          x: "day_temp('dining room')",
          start: "09:30",
          end: "22:30",
          months: "1-4,9-12",
          weekdays: "6-7",
        }
      - {
          x: "off_temp('dining room')",
          start: "00:00",
          end: "23:59",
          months: "5-8",
          weekdays: "1-7",
        }

    vacation:
      - x: vacation_temp()

  watched_entities:
    - input_select.heating_mode
    - input_number.night_temperature
    - input_number.day_temperature
    - input_number.vacation_temperature

  schedule_prepend:
    - x: "Mark(OFF, Mark.OVERLAY) if not is_empty(filter_entities('binary_sensor', state='on', window_room=room_name)) else Next()"
  schedule_append:
    - x: night_temp('Default Fallback')

  rooms:
    office:
      rescheduling_delay: 5
      actors:
        climate.office_heating:
      watched_entities:
        - binary_sensor.window_office_contact
      schedule:
        - x: "IncludeSchedule(schedule_snippets['vacation']) if heating_mode() == 'Vacation' else Next()"
        - x: "IncludeSchedule(schedule_snippets['office']) if heating_mode() == 'Home' else night_temp('office')"

    dining:
      rescheduling_delay: 5
      actors:
        climate.heating_dining_room_thermostat:
        climate.heating_kitchen:
      watched_entities:
        - binary_sensor.sensor_window_diningroom_balcony_contact
        - binary_sensor.sensor_window_kitchen_1_contact
        - binary_sensor.window_kitchen_2_contact
      schedule:
        - x: "IncludeSchedule(schedule_snippets['vacation']) if heating_mode() == 'Vacation' else Next()"
        - x: "IncludeSchedule(schedule_snippets['dining']) if heating_mode() == 'Home' else night_temp('dining_room')"
You also need to map the windows to the rooms:
homeassistant:
    customize:
      binary_sensor.sensor_window_kitchen_1_contact:
        window_room: dining
      binary_sensor.window_kitchen_2_contact:
        window_room: dining
      binary_sensor.sensor_window_diningroom_balcony_contact:
        window_room: dining
      binary_sensor.window_office_contact:
        window_room: office